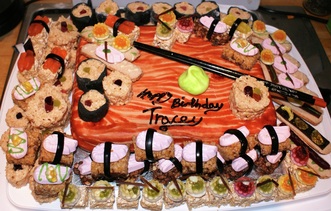
So when the person you make a cake website with has a birthday you have to make an effort so I made a sweetie sushi feast on a bed of surprise rainbow cake. This was my first go at this so there are definitely some tweaks I would make but I will share those as we go along.
Ingredients for the surprise rainbow cake base:
350g Plain Flour
2 1/2 tsp Baking Powder
1/4 tsp Salt
250g Unsalted Butter (At room temperature.)
100g Caster Sugar
1 tsp Vanilla Essence
3 Large Eggs (At room temperature.)
180ml Full Fat Milk
Red, Blue and Yellow Food Colouring
Jam (Your favourite flavour - I used Cherry)
White Royal Icing (Ready to roll is easiest.)
Icing Sugar
Set of Chocolate/Caramel writing icing
Ingredients for the Sushi:
100g Rice Krispies
50g Unsalted Butter
200g Marshmallows
1 tsp Vanilla Essence
Jelly Snakes
Licorice Wheels
Various Jelly Sweets
Chocolate/Caramel writing icing
Green writing icing
Rice Krispie Squares
Ready made rice krispie snacks
Sponge Fingers (Trifle Fingers)
Fruit bars
OK so to start we need to make the rainbow cake base so preheat your oven to 180C/350F/Gas Mark 4 then grease your tin and cut out a piece of greaseproof paper to put in the bottom of the tin. Measure out all of you ingredients and put the flour, salt and baking powder in one bowl and the butter and the sugar in a large bowl and with and electric mixer beat them together until lighter in colour and creamy. Then with the mixer on a medium speed add the eggs one at a time ensuring each time the egg is fully mixed in before adding the next. Once all of the eggs have been added turn the mixer to a low speed and gradually add the mixed dry ingredients alternating with the mix until everything is completely mixed.

Divide the cake batter evenly between 6 bowls, add red to one, blue to another and yellow to another. Then add a mix of blue/red for purple to another, red/yellow for orange to another and yellow/blue for green to the last bowl until you have the desired brightness.
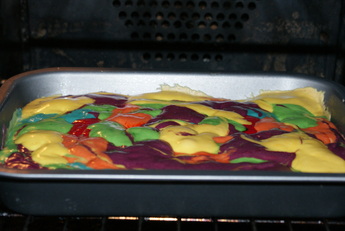
Fill your pan mixing the colours as you go, once you have used all of the batter put a toothpick into the centre and spiral outwards to mix the colours through the cake and bake for approx 30 minutes. Test with a skewer and only remove the cake when it comes out clean.
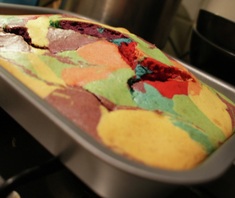
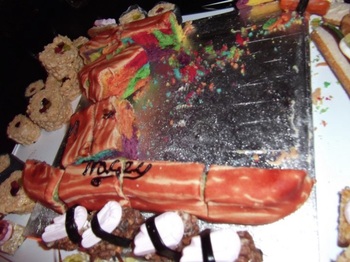
Let the cake cool in the tin for ten minutes then turn out onto a wire rack . Allow the cake to completely cool and then slice off the raised mound so your cake is flat on both sides and place on a cake board. Melt a tablespoon of jam in a small saucepan and brush the cake using a pastry brush. Prepare a large flat surface with icing sugar and mix some food colouring into the royal icing. When I did mine I feel that I made mine too orange, if you look at the pics you'll see. I think you should go for a yellowish base colour. Once you have the right colour roll out your icing until it is big enough to cover the cake. Gently roll the icing over your rolling pin, lift and then place over your cake. Tuck the icing around the cake and smooth with your hands. (Dust your hands with icing sugar first to prevent sticking.) Once your cake is neatly covered mix some food colouring in a dark brown shade and paint on the wood grain effect. Then it's time for the Sushi.
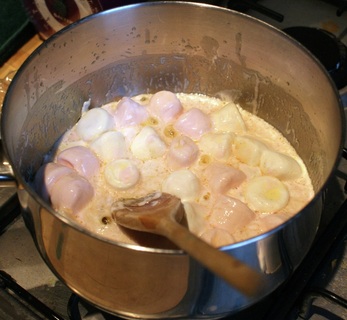
First we will make the rolls. Melt your Marshmallows and the butter together in a large saucepan. While they are melting lay out a tea towel and tear yourself several sheets of clingfilm and lay one of them out on the tea towel. Once everything is completely melted then add the rice krispies, mix them up until all the krispies are coated. This next part is tricky because it is so sticky!
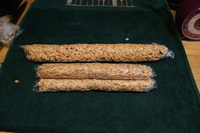
Scoop some of the krispies out and place them in an even line across your clingfilm, then push your choosen colour of jelly snake into the centre. Then using the clingfilm to help you roll the krispies around the snakes until they are encased in the centre and wrap in the clingfilm, I then gave mine a little extra roll to even them out and put them in the fridge to chill for at least one hour. Have some fun, I made three small ones using different colour snakes and then one large one with all three colours inside. When they were chilled I chopped them with a sharp knife into bite sized pieces and wrapped some of the smaller ones in black royal icing to look like seaweed wrap.
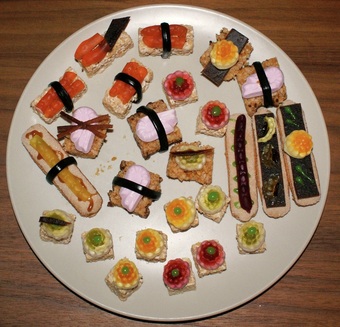
As for the rest of the sushi your imagination is your limit, I went with what sweets I could get my hands on at the local supermarket.
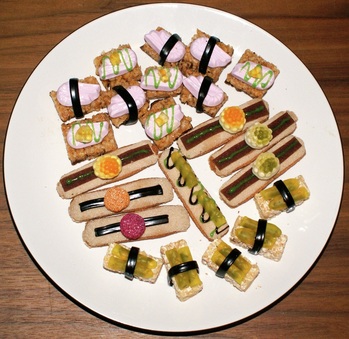
I used ready made rice krispie squares and sponge fingers as my bases, various jelly sweets for the 'fish', foam shrimps worked really well as did the Haribo juicy fruits you can see that look a bit like roe and I use green and white chocolate writing icing to look like sauce. I used unwound liquorice for the black bands and fruit snack bars for the flat black seaweed.
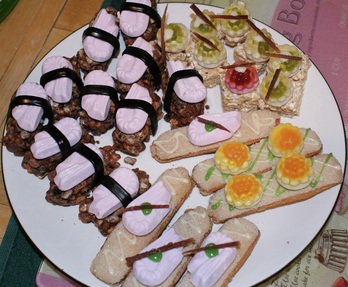
I used caramel writing icing to stick them all together and to stick the sushi to the cake.
I used dark chocolate writing icing to do the soy sauce writing. If I was to do the cake again I think that I would try and make it more clear that the writing was supposed to look like soy sauce perhaps by making a bottle from icing. My final touch was to dye a bit of Royal Icing green and make a bit of wasabi and add some chopsticks.
I used dark chocolate writing icing to do the soy sauce writing. If I was to do the cake again I think that I would try and make it more clear that the writing was supposed to look like soy sauce perhaps by making a bottle from icing. My final touch was to dye a bit of Royal Icing green and make a bit of wasabi and add some chopsticks.

 RSS Feed